Field Log · Entry
OpenClaw 사용법: Gateway·Workspace·Channel을 이해하는 첫날 (4/7)
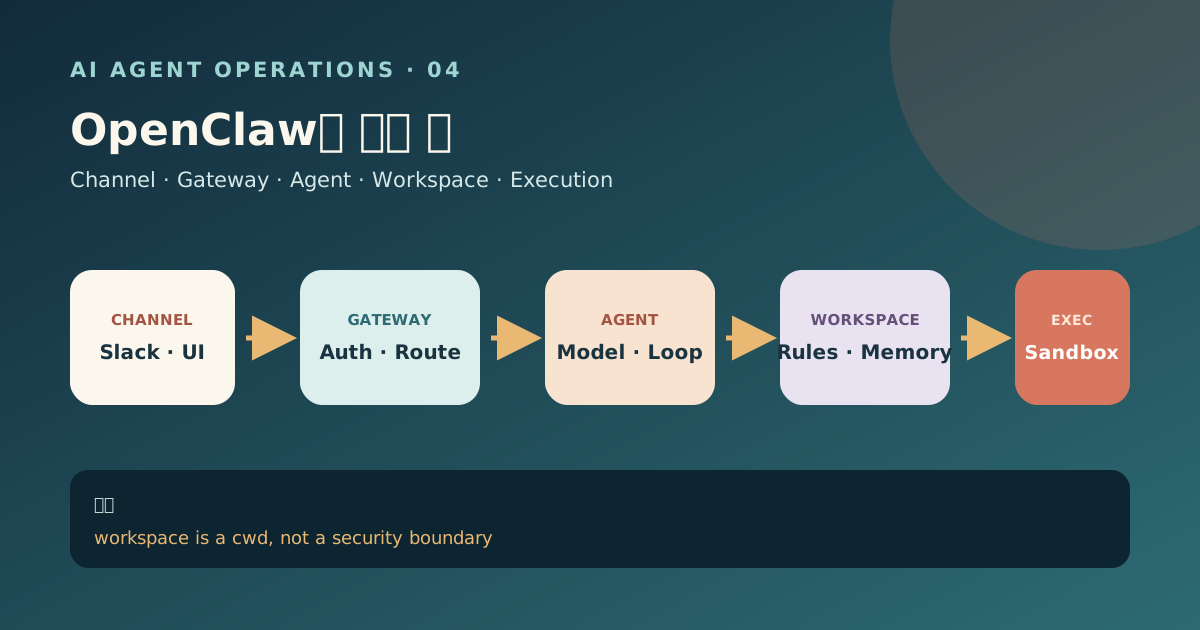
이번 글의 결론
- OpenClaw는 “Slack에서 여러 Claude Code를 부르는 wrapper”가 아닙니다. 현재 구조의 중심은 Gateway와 내장 Agent runtime입니다.
- Gateway는 연결·인증·routing·session·delivery를 맡고, 각 Agent는 자기 workspace·auth·session store를 가집니다.
- Workspace는 기본 작업 directory이지 자동 sandbox가 아닙니다. 절대 경로 접근을 막으려면 별도 sandbox와 tool policy가 필요합니다.
- 첫날에는 Dashboard에서 한 agent·한 model·읽기 전용 task를 검증하고, channel 연결은 그다음에 합니다.
- 봇 수보다
AGENTS.md,SOUL.md,TOOLS.md,USER.md, Memory의 책임을 먼저 분리합니다.
앞의 3편은 Hermes를 다뤘습니다. 이제 같은 질문을 OpenClaw에 적용합니다.
무슨 작업을 맡길 것인가?
어떤 문맥과 도구가 필요한가?
누가 요청할 수 있는가?
어떻게 완료를 검증하고 복구할 것인가?
이 글은 2026년 7월 21일, OpenClaw 2026.7.1 문서를 기준으로 작성했습니다. 설치 전에 공식 release note와 Getting Started를 확인하세요.
1. OpenClaw의 다섯 층
OpenClaw를 “chat bot” 하나로 보면 config가 복잡해 보입니다. 역할을 나누면 단순해집니다.
Channel
Slack · Telegram · WhatsApp · Discord · Control UI
                      ↓
Gateway
auth · routing · queue · session · delivery · health
                      ↓
Agent runtime
model · prompt assembly · agent loop · tool policy
                      ↓
Workspace
AGENTS · SOUL · TOOLS · USER · MEMORY · skills
                      ↓
Execution
host · sandbox · node · browser · external API
Agent runtime 문서는 OpenClaw가 자체 내장 agent loop를 제공한다고 설명합니다. Claude Code·Codex 같은 외부 coding harness를 연결할 수 있지만 그것이 OpenClaw의 정의는 아닙니다.
이 구분이 중요한 이유는 장애 지점을 찾을 수 있기 때문입니다.
- Slack message가 아예 안 옴 → channel·Gateway 문제
- message는 왔지만 다른 bot이 답함 → binding·routing 문제
- 엉뚱한 규칙으로 작업함 → workspace context 문제
- 파일을 과도하게 건드림 → tool policy·sandbox 문제
- 답은 만들었지만 전송 안 됨 → delivery 문제
2. 설치 전 첫 작업을 정한다
Hermes와 동일하게 읽기 전용 작업을 씁니다.
task: Astro blog 구조 설명
input:
  workdir: /path/to/blog
  files:
    - package.json
    - src/content.config.ts
    - src/pages/
allowed_tools: [read, search]
forbidden_tools: [write, edit, exec, browser, cron]
output:
  - build command
  - post schema 위치
  - route 생성 위치
  - 각 결론의 파일 근거
done_when:
  - 근거 없는 추정이 없음
“내 blog를 관리해줘”보다 좁지만, agent가 workspace 문맥과 file tool을 제대로 쓰는지 확인하기 좋습니다.
3. 설치와 Onboarding
현재 공식 문서는 Node.js 24 계열을 권장하고, 지원 가능한 정확한 최소 patch version을 별도로 명시합니다. 먼저 Getting Started의 현재 요구사항을 확인합니다.
macOS·Linux에서는 installer를 쓸 수 있습니다.
curl -fsSL https://openclaw.ai/install.sh | bashnpm global install 경로도 있습니다.
npm i -g openclaw설치 후 onboarding을 실행합니다.
openclaw onboard --install-daemonwizard에서 먼저 고정할 것은 다음 세 가지입니다.
- model provider와 credential
- 기본 agent workspace
- Gateway auth
Channel·plugin·skill을 전부 고르지 않아도 됩니다. 기본 chat이 성공한 뒤 openclaw configure로 돌아올 수 있습니다.
4. Gateway와 Dashboard부터 확인한다
openclaw gateway status
openclaw dashboard
기본 port는 18789입니다. browser에 Control UI가 열리면 먼저 새 대화에서 다음을 묻습니다.
현재 agent id, model, workspace path, 사용 가능한 tool을 알려줘.
아직 아무 tool도 실행하지 마.
그다음 첫 작업 계약을 그대로 보냅니다.
현재 workspace를 수정하지 마세요.
package.json, src/content.config.ts, src/pages만 읽고
build command, post schema 위치, route 생성 위치를 표로 정리하세요.
각 결론에 실제 파일 경로를 붙이고, 모르면 추정하지 마세요.
답변을 받은 뒤 실제 파일과 비교합니다. “대략 맞다”가 아니라 path와 command가 정확해야 통과입니다.
5. Workspace는 어떤 파일로 구성되는가
OpenClaw의 Agent Workspace는 agent가 장기간 유지할 operating context입니다.
| 파일 | 책임 | 넣지 않을 것 |
|---|---|---|
AGENTS.md | 작업 규칙·project map·기억 사용법 | secret, 장황한 대화 기록 |
SOUL.md | 성격·톤·행동 경계 | build command |
TOOLS.md | 도구별 사용 관례·환경 메모 | tool enable/deny 설정 자체 |
IDENTITY.md | agent 이름·표현 정체성 | project 규칙 |
USER.md | 사용자 선호·호칭 | team 전체 공개 정보 |
HEARTBEAT.md | heartbeat 때 확인할 항목 | 일회성 task |
MEMORY.md | 선별한 장기 기억 | raw log·매일의 상세 기록 |
memory/YYYY-MM-DD.md | 날짜별 작업 log | 항상 prompt에 넣을 핵심 규칙 |
skills/*/SKILL.md | 반복 절차 | 단순 사실 하나 |
첫 setup에서 만들어지는 BOOTSTRAP.md는 agent와 사용자가 정체성·선호를 정하는 one-time ritual용이고 완료 후 제거됩니다.
가장 중요한 경고
Workspace는 tool의 기본 cwd입니다. Multi-agent 문서는 workspace가 hard sandbox가 아니라고 분명히 경고합니다. sandbox가 꺼져 있으면 absolute path를 통해 다른 host 위치에 닿을 수 있습니다.
workspace = 기본 작업 위치
sandbox   = 실행 격리
tool deny = capability 제한
OS user   = host filesystem 권한
네 가지를 같은 것으로 취급하지 않습니다.
6. AGENTS.md를 첫 task에 맞게 줄인다
# Astro Blog Agent

## Purpose
Help inspect and maintain this Astro blog.

## Structure
- Pages: src/pages/
- Post schema: src/content.config.ts
- Posts: src/content/posts/**/*.md
- Static assets: public/

## Commands
- Build: npm run build
- Dev: npm run dev

## Default behavior
- Start read-only.
- Cite file paths for repository claims.
- Ask before changing files unless the request explicitly authorizes edits.
- After site changes, run npm run build.

## Never
- Do not read or modify .env files.
- Do not edit dist/ or node_modules/.
- Do not push, publish, or send messages unless explicitly requested.TOOLS.md는 tool을 허용하는 config가 아닙니다. 예를 들어 “image 확인에는 어떤 command를 쓰는가”, “VPS에서 docker compose는 어느 directory에서 실행하는가” 같은 사용 메모입니다. 실제 tool access는 openclaw.json의 policy로 제한합니다.
7. Memory는 log와 결론을 나눈다
Memory overview에 따라 날짜별 상세 기록은 memory/YYYY-MM-DD.md, 오래 유지할 결론은 root MEMORY.md로 나눕니다.
날짜 log:
# 2026-07-21

- Audited three posts.
- Found descriptions under 100 chars in two drafts.
- `npm run build` is the schema enforcement step.
선별 Memory:
# Durable project facts

- Astro content schema lives at `src/content.config.ts`.
- Every site change must pass `npm run build`.
- Never edit generated `dist/` output.
모든 대화를 MEMORY.md에 복사하면 매 turn의 context 비용과 충돌 가능성이 커집니다. 상세 내용은 memory search로 찾고, 항상 필요한 짧은 결론만 선별합니다.
8. 첫 Skill은 deterministic한 읽기 작업으로 만든다
OpenClaw Skill은 YAML frontmatter가 있는 SKILL.md입니다. workspace의 skills/가 가장 높은 우선순위를 가집니다.
workspace/
└── skills/
    └── astro-frontmatter-audit/
        └── SKILL.md
---
name: astro-frontmatter-audit
description: Validate Astro post metadata against the local schema
---
# Astro Frontmatter Audit
1. Read `src/content.config.ts` first.
2. Read only the requested Markdown frontmatter.
3. Report path, field, actual value, and violated rule.
4. Do not edit files.
5. Mark image existence as unknown unless verified.OpenClaw Skills 문서는 third-party Skill을 untrusted code처럼 취급하라고 안내합니다. ClawHub의 scan 상태는 참고 자료이지 무조건적인 신뢰 보증이 아닙니다. 설치 전 SKILL.md와 script를 읽고, 위험한 tool을 쓰는 Skill은 sandbox에서 시험합니다.
9. Channel은 Dashboard 성공 뒤 하나만 붙인다
Control UI task가 통과한 뒤 channel 하나를 선택합니다. 가장 단순한 개인 실험은 Telegram, 기존 업무 흐름과 연결하려면 Slack이 자연스럽습니다.
openclaw configure
openclaw channels status --probe
Channel을 연결한 뒤 두 종류를 모두 시험합니다.
- 허용한 사용자에게는 정상 응답
- 허용하지 않은 사용자에게는 pairing 또는 거부
Group/channel에서는 mention requirement와 allowlist를 켭니다. DM과 공개 channel이 같은 session·Memory를 공유한다고 가정하지 말고 routing key를 실제 status에서 확인합니다.
10. 첫날 진단 명령
openclaw status
openclaw status --all
openclaw status --deep
openclaw health --verbose
openclaw channels status --probe
openclaw logs --follow
openclaw doctor
용도가 다릅니다.
status --all: 안전하게 공유할 수 있는 local summarystatus --deep: 실행 중 Gateway와 channel live probehealth: Gateway health snapshotchannels status --probe: provider 연결 확인logs --follow: 실제 event와 routing 추적doctor: stale config·state·service를 진단하고 필요할 때 repair
처음부터 doctor --fix를 자동 실행하지 말고, 일반 doctor와 config diff를 먼저 봅니다.
11. 첫날 완료 기준
- 공식 installer와 기준 version을 기록했다.
- Gateway가 loopback과 auth 기본값으로 시작했다.
- Dashboard에서 한 model·한 agent를 확인했다.
- 읽기 전용 task가 실제 파일 근거와 함께 성공했다.
- Workspace 파일마다 책임을 나눴다.
- Workspace가 sandbox가 아님을 확인했다.
- Skill 하나를 직접 읽고 local workspace에 두었다.
- Channel은 하나만 연결했고 비허용 사용자도 시험했다.
-
status,health,logs,doctor의 차이를 안다.
마무리
OpenClaw 첫날의 산출물은 봇 개수가 아닙니다.
Gateway 1개
Agent 1개
Workspace 1개
검증 가능한 task 1개
허용 Channel 1개
이 다섯 개가 안정되면 channel에서 agent를 호출하는 경험이 “신기한 chat”에서 운영 가능한 interface로 바뀝니다.
다음 글에서는 이 구성을 Linux VPS의 Docker Gateway로 옮기고 Slack Socket Mode를 연결합니다. public webhook을 먼저 열지 않고 secret·volume·sandbox·health check를 포함한 구축 절차를 완성하겠습니다.
참고 자료
Reader questions
읽으며 남긴 질문
글을 읽으며 붙잡아 둔 질문입니다. 다시 살펴보거나, 보내지 않은 질문을 한 번에 블로그 주인에게 전달할 수 있습니다.